
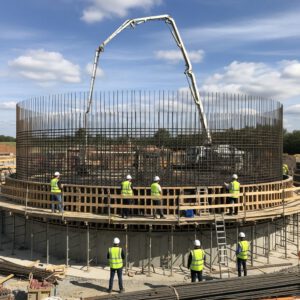
In the realm of hydraulic engineering, water tank construction represents a specialized discipline that bridges the gap between structural integrity and fluid mechanics. For construction engineers and project managers, building a containment structure is not merely about pouring concrete; it is about creating a monolithic, leak-proof vessel capable of withstanding significant internal hydrostatic pressure and, in the case of underground structures, external earth pressure and potential groundwater buoyancy. This comprehensive guide provides an exhaustive technical roadmap for the execution of high-performance water storage systems, ensuring long-term durability and compliance with international standards such as BS 8007 and IS 3370.
I tested Gemini and ChatGPT to turn a basic Navisworks screenshot into stunning, realistic visualizations. See the results of this AI rendering experiment and how it changes civil engineering workflows. See more details about The AI Render Revolution
Table of Contents
Table of Contents
Understanding the Engineering Fundamentals of Water Tanks
A water tank is a functional hydraulic structure designed to store water for various applications, including potable water supply, industrial cooling, and fire protection. Unlike standard residential buildings, the primary design driver for a water tank is the limit state of serviceability, specifically focusing on crack width control. In engineering terms, we must limit cracks to approximately 0.1mm to 0.2mm to prevent the ingress of water to the reinforcement, which would otherwise lead to rebar corrosion and structural failure.
Structural stability must account for several loading scenarios. For an underground water tank, the most critical condition occurs when the tank is empty, and the surrounding soil exerts maximum lateral pressure, potentially coupled with a high water table causing uplift. Conversely, for an elevated water tank, the structural design must prioritize seismic loads and wind forces acting upon the staging and the container itself. Every calculation must ensure that the water-cement ratio is strictly maintained (usually below 0.45) to achieve the necessary impermeability in the hardened concrete matrix.
Classifications and Types of Water Storage Structures
Engineering requirements and site constraints dictate the choice of tank type. As a site engineer, you must be familiar with the distinct execution challenges associated with each category.

1. Reinforced Concrete (RCC) Water Tanks
Reinforced concrete water tanks are the industry standard for large-scale municipal and industrial projects. They offer superior durability and can be shaped to fit specific site footprints. These tanks are further categorized into ground-supported, underground, and elevated types. The execution of RCC tanks requires rigorous attention to concrete grade (typically M30 or higher) and the placement of construction joints to manage thermal expansion and shrinkage.
2. Prestressed Concrete Tanks
For exceptionally large circular tanks, prestressed concrete is often utilized. By applying pre-compression to the concrete, we can effectively counteract the tensile stresses induced by water pressure. This method results in thinner wall sections and a higher degree of liquid-tightness, though it requires specialized equipment and highly skilled labor for the tensioning of the strands.
3. GRP and Sectional Steel Tanks
In fast-track projects or where access is restricted, Glass Reinforced Plastic (GRP) or bolted steel tanks are preferred. While these are prefabricated, the engineering challenge lies in the foundation design. The concrete plinth must be perfectly level to avoid localized stress concentrations on the tank panels. These systems are highly resistant to corrosion but require careful maintenance of the internal liners and sealants.
The Step-by-Step Process for RCC Water Tank Construction
The construction of a reinforced concrete water tank follows a logical progression of engineering phases. Each phase must be validated through strict Quality Assurance (QA) and Quality Control (QC) protocols before proceeding to the next step.
Phase 1: Site Preparation and Excavation
The process begins with an accurate survey and soil investigation. For underground tanks, excavation must reach the founding level dictated by the Soil Bearing Capacity (SBC). If the water table is high, a dewatering system (such as well points or sump pumps) must be operational throughout the construction period to prevent the “floating” effect or base instability.
Phase 2: Blinding Concrete and Raft Foundation
Once the excavation is leveled, a layer of lean concrete (blinding) is poured to provide a clean working surface. Following this, the raft reinforcement is installed. Site engineers must ensure that the bottom and top mats of rebar are separated by adequate concrete spacers and chairs to maintain the specified clear cover. Typically, a cover of 40mm to 50mm is required in water-retaining structures to protect the steel from moisture ingress.
Phase 3: Installation of Waterstops
The most critical component in preventing leakage at construction joints is the PVC waterstop. These must be installed at the junction between the floor slab and the walls (the “kicker” or “starter” joint). The waterstop must be securely tied so that it does not fold or displace during concrete pouring. Half of the waterstop width is embedded in the slab, while the remaining half will be encased in the subsequent wall pour.
Phase 4: Wall Reinforcement and Formwork
Wall reinforcement must be placed with precision, ensuring that the lap lengths are staggered and comply with structural drawings. For water tanks, tie rods used to hold the formwork together must be equipped with water-barrier washers (puddle flanges) to prevent water from tracking along the rod through the wall.
Phase 5: Concrete Pouring and Compaction
Concrete for water tanks should be poured in layers of 300mm to 450mm. Use of high-frequency immersion vibrators is mandatory to eliminate voids and honeycombing. Site engineers must monitor the slump test results constantly. A slump of 100mm to 120mm is usually ideal for pumpable concrete in congested reinforcement. Admixtures such as crystalline waterproofing agents can be added to the mix to enhance autogenous healing properties of the concrete.
Phase 6: Curing and Surface Finishing
Proper curing is vital to prevent shrinkage cracks. For water tanks, ponding or continuous spraying for a minimum of 14 days is recommended. Once the formwork is stripped, any surface imperfections should be treated with non-shrink grout. The internal surface may receive a food-grade epoxy coating or a cementitious waterproofing slurry to provide an additional barrier against leakage.
Testing and Quality Control: Hydrostatic Testing
Before any water tank is commissioned, it must undergo a hydrostatic test. This is the definitive proof of the structure’s integrity. The tank is filled with water at a rate not exceeding 0.5 meters per day to allow the concrete to stabilize. Once full, the water level is monitored for 7 days. According to BS 8007, a permissible drop (after accounting for evaporation) is usually around 10mm or a specific percentage of the total volume. If leakage is observed, the tank must be drained, repaired, and re-tested.
Common Challenges and Engineering Solutions
Construction in the field often deviates from the ideal conditions described in textbooks. Experienced engineers must be prepared for the following realities:
- High Ground Water Table: Solution: Implementing a robust dewatering system and designing the raft with additional mass or anti-floatation piles to resist buoyancy forces.
- Honeycombing at Wall Base: Solution: Using a ‘kicker’ of 100mm to 150mm and ensuring the first lift of wall concrete is preceded by a layer of cement-rich grout to improve bonding.
- Thermal Cracking in Mass Concrete: Solution: Controlling the temperature of the concrete mix (using chilled water or ice) and using low-heat cement (Fly ash or GGBS blends) to reduce the heat of hydration.
- Joint Failure: Solution: Meticulous cleaning of joints using wire brushes or air jets before the next pour to ensure a perfect mechanical bond between old and new concrete.
Frequently Asked Questions (FAQ)
What is the best concrete grade for water tank construction?
For most municipal and industrial water tank construction, a minimum grade of M30 is required. However, M35 or M40 is often specified for larger structures to ensure higher density and lower permeability. The focus is not just on strength, but on the water-cement ratio and the cement content, which should be sufficient to ensure durability in a submerged environment.
How do you prevent leakage in underground water tanks?
Leakage prevention is achieved through a multi-layered approach: proper structural design to limit crack widths, the use of PVC waterstops at all construction joints, the inclusion of integral waterproofing admixtures in the concrete mix, and the application of external bituminous or crystalline membranes to protect against external groundwater ingress.
Why is ‘curing’ so important for water-retaining structures?
Curing ensures that the hydration process is completed, which significantly reduces the porosity of the concrete. In water tanks, incomplete hydration leads to capillary pores that allow water to seep through the structure. Continuous moist curing prevents plastic shrinkage cracking, which is the leading cause of initial leaks in new tanks.
Can I use ordinary mild steel for water tank reinforcement?
While mild steel can be used, modern engineering practice favors High-Yield Strength Deformed (HYSD) bars or TMT bars due to their superior bonding properties. In highly corrosive environments, fusion-bonded epoxy-coated rebar or galvanized reinforcement is recommended to extend the service life of the tank beyond 50 years.
Conclusion
Successful water tank construction is a testament to meticulous planning and precise site execution. By adhering to the principles of structural design, ensuring high-quality material selection, and maintaining rigorous supervision during the pouring and curing phases, engineers can deliver storage solutions that are both cost-effective and enduring. As the global demand for water infrastructure grows, mastering these technical competencies remains a vital asset for every construction professional.